Thursday, December 20, 2012

Kipfel


Kipfel are a very unusual cookie. They are similar to the Jewish cookie, hamantaschen, which are triangular cookies that hold a filling. This recipe features a rich dough base of butter and cream cheese. Its filling is reminiscent of old Hungarian recipes featuring nut fillings - in fact, these are called "kipfli" in Hungarian. The dough is rolled out thinly and cut into squares. The corners are pinched up to seal in the rich nut filling, and they bake into light, flaky and absolutely delectable little treats. They are quite rich, so only one or two should sate your sweet tooth. Also, if you're lucky...you may just have one or two cookies that split their seams and create what I call a "Necronomicon" cookie. If you don't understand the reference, watch "Army of Darkness" with Bruce Campbell, and you'll get it. This recipe does not make very many cookies, and you might find that you may want to make a batch and a half of the filling; the first time I made these, I ran out of filling before I was able to finish putting all the cookies together.

Kipfel

Dough:

1 cup unsalted butter, chilled
1 (8 oz.) package cream cheese (you can use reduced fat or fat free), at room temperature
2 cups flour
¼ tsp. kosher salt

Nut Filling:

1 cup walnuts, pecans or almonds, finely grated
1 tbsp. fine bread crumbs
½ cup sugar
1 tsp. cinnamon
1 tbsp. lemon juice
½ cup cream (you can use milk)

To make the dough, cut the butter into the dry ingredients, using a pastry blender. Add the room temperature cream cheese and blend well. Chill the dough until it is firm (times will vary based on your refrigerator). Prepare the nut filling while you are letting the dough chill.

To make the filling, combine all the ingredients in a small saucepan. Cook gently over low to medium heat, stirring constantly, until the mixture becomes thick. Take it off the heat and let it cool completely.

When the dough is firm, roll it out thinly (think about 1/8 - ¼" thick) on a floured canvas. Cut the dough into 3" squares - don't be embarrassed to use a ruler to help you measure the squares; it REALLY helps.

Fill the center of each square with a teaspoonful of the nut filling. If desired, you can use other fillings, such as puréed dried apricots, prunes, or thick marmalade or jam.

Bring the corners up to the center, forming a little peak. Press the seams together and place on ungreased cookie sheets.

Bake at 400 degrees for about 15 minutes, or until the bottoms are golden brown. Do not be alarmed if your cookies appear to have split at the seams; this is normal. Remove the cookies to a rack and let them cool a little. While they are warm, sprinkle with confectioners sugar.

Makes about 3 dozen


Nanaimo Bars


"Nanaimo Bars (NBs for short) are one of Canada's favorite confections. The beautiful city of Nanaimo, British Columbia, has claimed these squares as their own, telling us on their website that it all began when a Nanaimo housewife entered a recipe for chocolate squares in a magazine contest some 35 years ago. She called her recipe 'Nanaimo Bars' and when she won the contest, not only did her dessert become popular throughout Canada, so did the town they were named after."

Nanaimo bars are a rich, delicious treat. They are a three-layered dessert, featuring a crumb base, with a middle layer of a light custard buttercream, and topped with a glorious layer of semi sweet chocolate. Best of all, they are a no-bake confection, which means you can save time, energy and money making these. There are many, many recipes out there for Nanaimo bars, but this one can be considered a basic "standard" recipe. Do try to use Bird's Custard Powder in these instead of vanilla pudding powder - there is a difference. You can order Bird's Custard Powder online; I was able to buy some through World Market's website. 

Since these are very rich, just a little square will do. However, if you've a major sweet tooth, you may just go through these pretty quickly!

Nanaimo Bars

Base:

½ cup unsalted butter, at room temperature
¼ cup sugar
1/3 cup unsweetened cocoa powder
1 large egg, lightly beaten
1 tsp. pure vanilla extract
2 cups graham cracker crumbs
1 cup sweetened or unsweetened coconut (shredded or flaked)
½ cup walnuts or pecans, coarsely chopped

Middle:

1 cup milk

¼ cup heavy cream
1/3 cup sugar
2 tbsp. Bird's custard powder (or vanilla pudding powder)
2 egg yolks
1 tsp. pure vanilla extract
Pinch of salt

Top:

4 oz. semi sweet chocolate
¼ cup plus 2 tbsp. heavy cream

Butter or spray a 9 x 9" square pan with nonstick cooking spray.

To make the bottom layer, start by melting the butter in a small saucepan over low heat. Remove from the heat and stir in the sugar and cocoa powder. Gradually whisk in the beaten egg. Return the saucepan to low heat and cook, stirring constantly, until the mixture thickens (about 1 - 2 minutes). Remove from the heat and stir in the vanilla extract, graham cracker crumbs, coconut and the nuts. Press the mixture evenly into the bottom of the prepared pan. Cover with plastic wrap and refrigerate until firm (about 1 hour).

To make the filling, combine the milk and heavy cream in a medium saucepan.  Cook, stirring frequently, over medium heat until the mixture begins to simmer. Meanwhile, in a separate bowl, beat on high speed until thick and pale yellow the sugar, Bird's custard powder, the egg yolks and a pinch of salt. Gradually pour about ¼ of the milk mixture into the egg mixture, whisking constantly. Scrape the egg mixture back into the pan with the milk and cook over medium heat. Whisking constantly, cook until the mixture is thickened and begins to bubble. Continue to cook and whisk vigorously for another 1½ minutes. Remove from the heat and stir in the vanilla extract. Pour everything over the prepared crust and put it in the refrigerator to cool completely and thicken; this may take a few hours.

To make the top layer, chop the chocolate into small pieces. Then, in a heatproof bowl set over simmering water (a double boiler), melt the chocolate and heavy cream. Stir well so the ganache is very smooth. Let the ganache cool to about 85 degrees before applying to the custard layer. Pour the ganache over the custard, gently spread it to the corners (this can be tricky), and put it back in the refrigerator for about 30 minutes to firm up slightly before serving. As a note, because this is a ganache topping, it will NEVER harden fully. This is normal, and will also ensure that you won't get any of the dreaded cracking when you slice the bars.

Makes about 25 squares

NOTE:  The picture featured here is of Nanaimo Bars NOT made using this particular recipe; I used a different one and encountered so many problems with it, that I did not want to share that one with you. This recipe shown here will ensure perfect results.

Monday, December 17, 2012

Orange-Chocolate Dipped Biscotti


I'm reprising a recipe already featured on this blog, but since it's the holidays, I'm doing something special with this. This features my Classic Biscotti with one end coated in delicious orange chocolate with bits of almonds in it. I will not show the recipe again here, but if you need a refresher, please head over to my Classic Biscotti (Reduced Fat) page.

The only special thing you will need is a few orange chocolate bars. I use the Lindt's Intense Orange chocolate bar, which is dark chocolate with the orange and the almonds. You should be able to find this at your local grocer in the candy aisle along with all the other chocolate bars. If you want to use a different type of orange chocolate, by all means, do so!


Break your chocolate bars (I needed two) into individual squares. Put them in a small bowl and put them in the microwave. Cook at 30 second intervals, stirring well each time, until the chocolate is melted; since you're not adding anything to keep the chocolate fluid, it's going to be slightly thicker.

Take a spoon and drip chocolate over one end of each biscotti, using the spoon to smear and spread the chocolate around the edges. Set each cookie either on a rack set over waxed paper to catch any drips, or simply lay them on a sheet of waxed or parchment papers. The chocolate will need some time to set up, so make sure they're in a place where they will be undisturbed for a few hours.

When the chocolate is dry, layer the biscotti into a tin, with each layer separated by waxed or parchment papers. Make sure the lid is on securely. Do not freeze these cookies; since the chocolate is not properly tempered, it will most likely develop a grey 'bloom' if exposed to extreme cold. Keep them in a cool, dry place until ready to eat.

Try dunking these in a hot cup of coffee on a cold winter's night...


Saturday, December 15, 2012

Orzo and Vegetables


Pasta, pasta, pasta! What could be more simple, yet fulfilling, than a hearty pasta dinner? What could also be better than an affordable, quick dinner, too? This simple recipe uses a small amount of ingredients, most of which can be picked up for probably less than $10 (minus the pecans, which are currently the second most expensive nut in the markets, behind macadamias). The recipe is basic enough that you can easily tweak it by adding more vegetables, herbs, other nuts, and lean cooked meats (like chicken breast or roasted shrimp). This is great for any meatless night you may have during the week. I know the recipe states "orzo" in the title, but for some dumb reason, my grocery store did not have any orzo on the shelves. So, the pasta shape you are seeing in the picture is the tiny pasta, acini de pepe. If you want a wine pairing for this meal, a good white wine would be your best bet, even if you add lean meat.

Orzo and Vegetables

2 cups orzo
2 - 3 tbsp. extra virgin olive oil
2/3 cup finely chopped onion
4 medium zucchini, cut into 2 x ½" pieces
2 cup fresh or frozen corn kernels
½ cup chopped pecans (if desired, you can toast them first)
1 tbsp. chopped fresh dill
Kosher salt
Freshly ground black pepper

Cook the orzo in a pot of boiling, salted water according to the package directions until al dente. Turn the orzo into a colander and set aside to drain.

Heat the oil in a large skillet. Add the onion and sauté until transparent. Add the zucchini, corn and ½ cup of water to the skillet. Cover and cook the veggies over medium heat about 5 minutes, or until just tender. Salt the vegetables lightly at this point - you don't want to cook out all the water from them before you mix in all the other ingredients.

Add the orzo, pecans and dill to the skillet and cook, stirring, until heated through. Stir in a little black pepper, about ¼ to ½ teaspoon.

Serve immediately on warmed plates and if desired, sprinkle with a little kosher salt and some fresh pepper.

Serves 4 - 6

Thursday, December 13, 2012

Pistachio Cookies


If you're looking for a cute little cookie to become part of your holiday baking repertoire, this recipe is sure to tickle your fancy. What could be more festive than green-tinted cookies at Christmastime? These cookies are very simple and don't require too many specialized ingredients, other than pistachios, and maybe pure almond extract. These little cookies are so good that you may just find yourself making them all year round instead of just at Christmas...

Pistachio Cookies

½ cup unsalted butter, softened
1 cup granulated sugar, divided
¼ cup canola oil
¼ cup water
1 egg
½ tsp. pure almond extract (NO IMITATION!)
2 (3.4 oz.) packages instant pistachio pudding
¼ tsp. kosher salt
1 tsp. baking powder
2¼ cups flour
2/3 cup chopped pistachios

Preheat the oven to 350 degrees.

In the bowl of a stand mixer fitted with the paddle attachment, cream the butter with ½ cup of the sugar.

Add the oil, water, egg and almond extract; mix well. Make sure to scrape down the sides and bottom of the bowl to make sure all the ingredients are well-incorporated.

In a separate bowl, combine pudding mix, salt, baking powder and flour. Gradually blend the dry ingredients into the wet, mixing just until all the flour disappears. Stir in the pistachios.

Shape level tablespoonfuls of the dough into balls; roll them in the remaining ½ cup sugar. Place the cookies 1 inch apart on parchment paper-lined cookie sheets. If you do not have parchment paper, do NOT roll the cookies in sugar; the sugar will burn onto your baking sheet and burn the bottom of your cookies. If not using the sugar, do grease your baking sheets well.

Bake for 15 - 18 minutes. Remove the cookies to a rack and let them cool completely.

Makes about 4 dozen

Saturday, December 8, 2012

Parsnip Purée


I know it's not often when I share a recipe for specifically a side dish, but this one might just become your new favorite instead of mashed potatoes. This simple, ridiculously cheap recipe combines both potatoes and parsnips to create a delicious, earthy side that pairs just like mashed potatoes - serve it alongside your roasts, chicken, etc. If you're wondering what a parsnip is, it's similar to a carrot in terms of appearance, but is white and tastes very similar to a carrot. Most grocery stores should carry parsnips, but if for some reason you can't get parsnips, substitute an equal amount of regular carrots. This will be a perfect side for your autumn feasts, particularly Thanksgiving. As a note, despite the addition of potatoes, this dish tastes mostly of the parsnips (the carrot profile). If this sounds like it may be too much of a carrot overload for you, simply use potatoes the whole way through.

Parsnip Purée

8 oz. baking potatoes, peeled and sliced thinly
1 lb. parsnips, peeled, halved, and cut in thick slices
Small piece of fresh peeled ginger (optional)
½ cup milk, light or heavy cream
1½ tbsp. butter, softened
½ tsp. kosher salt
¼ tsp. ground white pepper

Place the potato slices in a large saucepan. Add water to cover generously. Bring to a boil and cook for five minutes. Add the parsnips and continue cooking until both vegetables are completely tender, about 25 minutes.

Drain and return the vegetables to the pan. Working over low heat, mash the vegetables with a potato masher or beat with a hand-held mixer until very smooth.

Mix in the milk, butter, salt and pepper. Taste and adjust the seasonings and cook just until heated through. Serve piping hot. If desired, top with a beurre noisette or a cress butter. Snipped chives also make an appealing presentation.

Serves 4 - 6

Monday, October 29, 2012

Turkey and Pasta Bake


Autumn is here, and with a vengeance, I might add. Cold and blustery is the only way to describe the weather. Tonight, I was in the mood for something rich, sinful and indulgent. Now, you might be thinking it was something heavy and either starch or dairy-based. You'd be highly incorrect. This dish is mostly protein-based with lighter starch and even lighter dairy based accents. Lean ground turkey and turkey bacon combine with some simple savory ingredients to create a delicious, wholesome meal. The downside is that it takes a little longer to make, since there's about an hour of simmering time in order to render down the vegetables, but it spends only about 20 - 30 minutes in the oven. Once it's ready, however, be prepared to dig in and wholly prepare to have NO leftovers. Serve this with tiny dinner rolls (I found some delicious rye dinner rolls at the grocery store today), and a good red wine. Plus, since it's nearly Halloween, why not eat in front of the TV and enjoy a good scary movie?

Turkey and Pasta Bake

10 oz. lean ground turkey
5 oz. smoked turkey bacon, chopped
1 - 2 garlic cloves, crushed
1 onion, finely chopped
2 carrots, peeled and diced
2 tbsp. no salt added tomato paste
12 oz. fat free, reduced sodium chicken stock
8 oz. rigatoni or penne pasta (I used low-carb pasta)
2 tbsp. grated Parmesan cheese
Kosher salt
Freshly ground black pepper

Brown the turkey in a nonstick saucepan over medium heat. Make sure there are no large chunks of turkey (think the consistency of sloppy joes). Add the chopped turkey bacon, garlic, onion, carrots, paste, stock and seasonings. Bring to a boil, then reduce to a simmer. Cover and cook for 1 hour, until the vegetables are tender.

While the meat mixture is cooking, preheat the oven to 350 degrees. 

Cook the pasta in a large pot of boiling, salted water according to the package directions, until al dente; you may want to undercook the pasta by a minute or two, because it's going to finish cooking while it's in the oven. Drain the pasta thoroughly and mix with the turkey sauce.

Transfer the mixture to a shallow ovenproof dish and sprinkle with the grated Parmesan cheese. Bake for 20 - 30 minutes, until it's lightly browned on top.

Serve immediately with sides of your choice.

Serves 4

Wednesday, October 3, 2012

Butterscotch "Blondie" Oatmeal Cookies


Let me make this perfectly clear. As a rule, I loathe anything butterscotch-flavored. The only exceptions are the little Brach's butterscotch candies, and these cookies. Rich, toothy, delicious and wholesome are four words that aptly describe this particular cookie. This is a take on a chocolate chip oatmeal cookie, essentially, and with the inclusion of butterscotch chips instead of chocolate, it turns into a "blondie" instead (like "blondie" brownies). These little morsels are very rich, so ideally, make them small. Less is definitely more. However, you may find yourself dipping into the cookie jar repeatedly throughout the day. Don't blame me!
Butterscotch "Blondie" Oatmeal Cookies

1 cup unsalted butter, at room temperature
½ cup Truvia Baking Blend (or, 1 cup granulated sugar)
1 cup dark brown sugar, lightly packed**
2 extra large eggs, at room temperature
2 tsp. pure vanilla extract
1½ cups flour
1 tsp. baking powder
1 tsp. ground cinnamon
1 tsp. kosher salt
3 cups old-fashioned oatmeal
1 (11 oz.) bag butterscotch chips
1 cup walnuts, coarsely chopped (or, 1 cup toasted pecans, coarsely chopped)

In the bowl of a stand mixer fitted with the paddle attachment, cream the butter and the sugars until light and fluffy (about 3 to 4 minutes on medium high speed). Turn the mixer to low and add the eggs one at a time. Beat in the vanilla.

In a medium mixing bowl, sift together the dry ingredients, minus the oatmeal. With the mixer on low, slowly add the dry ingredients and mix just until the flour disappears.

Turn off the mixer, then add the oatmeal, butterscotch chips and the nuts. Beat on low speed briefly to combine. 

Chill the dough in the refrigerator for an hour or two. When ready to bake, preheat the oven to 350 degrees.

Line two baking sheets with parchment paper, or coat them with nonstick cooking spray. Using a small cookie scoop, drop the dough onto the cookie sheets. Dampen your fingers with a little bit of water and press the cookies down slightly.

Bake for 10 minutes, or until the edges are lightly browned. Let the cookies cool on the sheets for 5 minutes; this is an important step, so do NOT skip it.

Remove the cookies to racks and let them cool completely. Store in air-tight containers for up to 5 days. These can also be frozen.

Yields about 5½ dozen

NOTE:  I made my own dark brown sugar using the Truvia Baking Blend. Use ½ cup of the Truvia and combine it with 2½ tsp. molasses (do not use blackstrap). Combine the Truvia and molasses until it's well-blended and has the consistency of regular brown sugar. You'll be surprised at how good these cookies taste despite how little actual sugar is in them.

Saturday, September 15, 2012

Spicy Baked Catfish with Garlic Butter


Cooking for two can be a difficult task. Most recipes are usually for a minimum of four people, and if you're not into leftovers (like me), money starts going to waste. This is a fast, easy, and delicious recipe that'll give you a good punch in the mouth; highly flavorful spices adorn simple catfish fillets, but turn them from something bland into something delicious. This recipe is a variation on the Southern favorite of blackened catfish. If going for the authentic feel, you can serve this with traditional Southern sides, such as coleslaw, braised greens or fried okra - of course, steamed or lightly sautéed vegetables is perfectly acceptable (and a little bit more healthy, too). You can also turn the fillets into po' boy sandwiches (see the note below). For a twist, why not try using skinless salmon fillets? If serving the fillets by themselves, pair a good chardonnay with the dish. For po' boys, a light lager will suffice.

Spicy Baked Catfish with Garlic Butter

1 tsp. lemon-pepper seasoning
1 tsp. paprika
½ tsp. garlic powder
Dash, to 1/8 tsp. cayenne pepper
2 (6 oz.) catfish fillets
2 tbsp. unsalted butter, softened, divided
1 small garlic clove, minced
2 lemon wedges

Heat the oven to 450 degrees. Spray a small rimmed baking sheet with cooking spray.

Combine the lemon-pepper seasoning, paprika, garlic powder and cayenne pepper in a small bowl. Sprinkle the seasoning mix over the catfish. Place on the baking sheet and dot each fillet with 1 tbsp. of the butter.

Bake 14 to 16 minutes or until the fish just begins to flake.

Meanwhile, combine, combine the remaining tablespoon of butter with the garlic in a small bowl. Top the fish with the garlic butter and serve with the lemon wedges.

Serves 2

NOTE:  If you want to turn these into po' boy sandwiches, lightly toast a split baguette. Lay the fillet on the bottom half of the baguette. Garnish with shredded lettuce, tomatoes, and sliced pickles. If desired, you can spread the top and bottom halves with a little bit of mayonnaise made with canola oil.

Friday, September 14, 2012

Warm Herbed Macaroni and Mozzarella Salad


Pasta is just one of those things that will always warm the cockles of me 'eart. Blame it on my Hungarian ancestry, maybe? Genetics notwithstanding, this warm pasta salad will be sure to put smiles on the faces of your family members. It's delicious, ridiculously simple to make, and makes a lot. A simple vinaigrette of vinegar, olive oil and lemon juice meets fresh basil, parsley, gooey mozzarella cheese and of course, elbow macaroni, to make a delicious main or side salad. It's great served alongside a meat-based main course, especially beef (think steaks). It's also great if you're doing a meatless main - you can serve it with a green salad and garlic bread for a complete meal. If you want to go for an ultimate indulgence, use full fat mozzarella; try fresh mozzarella for an interesting twist! You also do not have to use gluten-free noodles; I just prefer them over regular wheat noodles.

Warm Herbed Macaroni and Mozzarella Salad (Recipe Adapted from Paula Deen)

2 tbsp. extra virgin olive oil
2 tsp. red wine vinegar
2 tsp. freshly squeezed lemon juice
8 oz. (2 cups) gluten-free elbow macaroni, uncooked
½ cup chopped fresh basil
1 tbsp. chopped fresh parsley
1 cup shredded reduced fat mozzarella
Kosher salt
Freshly ground black pepper

In a small bowl, combine the olive oil, vinegar and lemon juice. Whisk in the salt and pepper until thoroughly blended.

Bring a large pot of water to a boil; salt the water well. Cook the macaroni according to package instructions. Drain the noodles well and transfer them to a medium serving bowl. Add the basil, parsley, and half the dressing. Stir to combine. Let sit for 1 minute to cool slightly, then add the mozzarella and remaining dressing. Mix well, then serve warm.

You can serve this salad as either a side/light lunch or as a main dish; if serving as a main, you may want to double the recipe. If serving as a side or as a small lunch, serve with garlic bread.

Serves 4 - 6

NOTE:  If desired, you can sub out the vinaigrette recipe listed here with a bottle of good quality Italian dressing (recommendation:  Kraft's Italian dressing made with extra virgin olive oil). Add enough dressing to moisten the noodles, then add the cheese and a little more dressing. You want enough on there so it's flavorful, but not so much that it's swimming with dressing.

Saturday, September 8, 2012

Vegan Chocolate Pumpkin Gingerbread


I'll admit it - I'm getting tired of summer. Gasp! Did I just say that? As much as I adore summer, I'm gearing up for the cooler, crisper days of autumn. Bring on dishes of butternut squash, pumpkin, apples... I dream of cinnamon, ginger, nutmeg and cloves. This quick little recipe makes use of all the good, warm "fall" spices typically associated with pumpkin pie and turns out to be a moist, delicious gingerbread. No, not gingerbread cookies - I'm talking about the old-fashioned gingerbread baked in cake pans. This particular recipe is greatly reduced in sugar due to the substitution of the Truvia baking blend, so don't feel too bad about having a second piece. It's quite low in fat, since a few scant tablespoons of heart-healthy canola oil are used. The nutritional value is greatly increased (especially dietary fiber) due to the canned pumpkin. Serve this with your favorite vegan ice cream, or just a dusting of confectioners sugar. A good cup of coffee wouldn't hurt, either.

Vegan Chocolate Pumpkin Gingerbread

1 2/3 cups flour
½ cup + 2 tbsp. Truvia Baking Blend (or, 1¼ cups sugar)
3 tbsp. cocoa powder
1 tsp. baking soda
¾ tsp. kosher salt
½ tsp. cinnamon
½ tsp. ginger
¼ tsp. nutmeg
¼ cup unsweetened almond or soy milk
1 tsp. apple cider vinegar
1 (15 oz.) can pumpkin purée (NOT pumpkin pie mix!)
3 tbsp. molasses
2 tbsp. canola oil
1 tsp. vanilla extract
¾ cup dairy-free mini chocolate chips (or 1 cup dark, dairy-free regular sized chocolate chips)

Preheat the oven to 350 degrees. Lightly oil an 8 x 8" square cake pan and set aside.

In a large mixing bowl, sift together the flour, sugar, cocoa powder, baking soda, salt, cinnamon, ginger and nutmeg until well-mixed. Set aside.

In a medium mixing bowl, whisk together the almond milk and vinegar until the mixture slightly curdles. Add the pumpkin purée, molasses, canola oil and vanilla, mixing until smooth. Fold the wet ingredients into the dry, mixing just until all the dry ingredients disappear. Do NOT overmix! Fold in the chocolate chips and blend until evenly distributed.

Spread the batter into the prepared pan and bake until a toothpick inserted into the center emerges clean, about 35 - 45 minutes. Allow the cake to cool on a wire rack completely before cutting into squares. Dust with confectioners sugar before serving, if desired.

Serves 10 - 12

NOTE:  Because raw pumpkin is used in this recipe, you must refrigerate any leftovers. This will prevent mold formation or any kind of spoilage.

Sunday, August 19, 2012

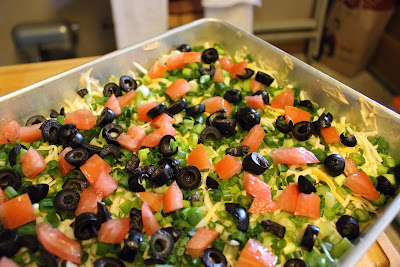
Taco Dip


It's taco dip. It's great for parties, never ceases to impress guests and never fails to completely disappear. MAKE IT.  For reference, you can easily swap out the full fat sour cream and cream cheese for reduced fat or fat free versions with no loss of consistency, flavor or texture.

Taco Dip

16 oz. sour cream
16 oz. cream cheese
2 - 3 packets Ortega Hot and Spicy taco seasoning
Crushed red pepper flakes (optional)
Shredded lettuce
Sargento 4-Cheese Mexican Blend
Scallions, sliced thinly
Beefsteak tomato, jelly and seeds removed, and diced
Sliced black olives

Make sure the cream cheese is completely at room temperature before you even begin. When ready to prepare, combine the sour cream, cream cheese and taco seasoning in the bowl of a stand mixer fitted with the whisk attachment, or use a hand mixer. Cream cheese has a tendency to be slightly lumpy even when at room temperature, so be sure to whip everything up as thoroughly as possible for a smooth consistency.

Scoop the seasoned mixture into a 13 x 9" pan. Smooth it out evenly, then liberally sprinkle crushed red pepper flakes over the top (optional). Evenly layer in this order:  lettuce, cheese, scallions, tomatoes and olives. 

Refrigerate until ready to serve. If serving the next day, make the base and sprinkle with the pepper flakes. Refrigerate it, then assemble the rest of the layers before serving.

Serve with sturdy tortilla chips for scooping and with a good beer to quell the fire!

Serves A LOT

Sunday, August 5, 2012

BBQ Rubbed Pork Chops


Summer's not over yet, so there's still plenty of time to enjoy barbecued foods. This easy and quick recipe is highly flavorful, easy to make and can be on the table in less than 30 minutes. Rich, savory spices slightly blacken on the pork chops to create a bit of a crust, which is every bit as delicious as the rest of the chops. Serve with sides of your choice - suggestions include steamed vegetables and mashed potatoes (as shown in the photograph). You can swap out the bone-in chops for boneless ones, but keep in mind it is very easy to turn them into shoe leather through overcooking. Watch them like a hawk and you will still be rewarded with moist, delicious chops. This recipe is naturally gluten-free; if you want to make it refined sugar-free, you could always substitute the light brown sugar with an equivalent amount of dark agave syrup.

BBQ Rubbed Pork Chops

1 tbsp. light brown sugar
1 tsp. kosher salt
1 tsp. paprika
1 tsp. chili powder
¾ tsp. garlic powder
¾ tsp. ground cumin
¼ tsp. dry mustard
1/8 tsp. ground allspice
1/8 tsp. cayenne pepper
4 (6 oz.) bone-in, center cut loin pork chops, trimmed (about ½" thick)

Combine all the seasonings and rub over all sides of the chops.

Heat a grill pan over medium-high heat. Coat the pan with cooking spray. Add the pork and cook for 2 minutes on each side. Reduce the heat to medium and cook for 8 minutes or until done, turning occasionally. Note that if you are using boneless pork chops, you most likely will have to cook the chops for less than 8 minutes in order to avoid drying them out. Remove the chops from the pan and let stand for 5 minutes to let the juices redistribute. Serve immediately with sides of your choice.

Serves 4

Thursday, August 2, 2012

Blueberry Crumb Cake


Cakes do not have to be something fanciful in order to taste good. In fact, it's my opinion that the fancy decorated cakes more often than not are only average in taste, but almost outright "yuck." Okay, so that makes me a snob...so be it. This simple recipe will be sure to wow your family and friends, and it takes just minutes to prepare. It is excellent paired with coffee, and if desired, you can serve it warm from the oven with a scoop of good vanilla ice cream or frozen yogurt instead of serving it completely cooled, as the recipe suggests. Since there is no nutritional value to sour cream (which was listed in the original recipe), I used Greek yogurt instead - you get a boost of lean, healthful protein, the very slight tang, and of course, the moistness. If you want to cut down on the fat and cholesterol content a little, you can use egg substitute with no loss of texture or flavor. I also reduced the sugar a little by substituting Truvia for some of the refined sugar in both the streusel and cake.

Blueberry Crumb Cake

Cake:

6 tbsp. unsalted butter
½ cup granulated sugar
¼ cup Truvia (6 packets)
2 extra large eggs
1 tsp. pure vanilla extract
½ tsp. grated lemon zest
2/3 cup fat free plain Greek yogurt
1¼ cups flour
1 tsp. baking powder
¼ tsp. baking soda
½ tsp. kosher salt
1 cup fresh blueberries
Confectioners sugar, for sprinkling

Streusel:

¼ cup Truvia (6 packets)
1/3 cup light brown sugar, lightly packed
1 tsp. ground cinnamon
1/8 tsp. ground nutmeg
1 stick unsalted butter, melted
1 1/3 cups flour

Preheat the oven to 350 degrees. Grease and flour a 9" round baking pan.

To make the streusel, combine the granulated sugar, brown sugar, cinnamon and nutmeg in a bowl. Stir in the melted butter and then the flour. Mix well and set aside. The mixture will be very crumbly; this is normal. The crumbles shouldn't be overly large, but should not be too fine, either.

To make the cake, cream the butter and sugar on high speed for 4 - 5 in the bowl of an electric mixer fitted with the paddle attachment - just until it's light and fluffy. Reduce the speed to low and add the eggs one at a time. Add the vanilla, lemon zest and Greek yogurt. 

In a separate bowl, sift together the flour, baking powder, baking soda and salt. With the mixer on low speed, add the flour mixture to the batter until just combined. Dredge the blueberries with a little flour to make sure that they don't sink to the bottom of the pan. Fold in the blueberries by hand with a spatula, stirring gently until the batter is completely mixed.

Spoon the batter into the prepared pan and spread it out with a knife or thin spatula. Using your fingers, crumble the streusel evenly over the batter. Bake for 40 - 50 minutes, or until a cake tester comes out clean. If baking with convection, start checking the cake at around 25 - 30 minutes.  When the cake is done, cool it completely in the pan. When ready to serve, sprinkle confectioners sugar over the top, then slice and eat.

Serves 6 - 8


Sunday, July 22, 2012

Creamy Leek and Corn Orzo


If you're lucky enough to have good, sweet local corn this summer, I strongly suggest giving this unique recipe a try. It's free of refined sugars, relatively low in fat per portion, delicious, and a solid vegetarian recipe. This can easily be made vegan by using extra virgin olive oil in place of the butter. It can also be made gluten-free by using your favorite brand of GF orzo. Fresh corn is an absolute must here - if you can't get it, skip this dish altogether because you need the corn "milk" as a critical ingredient. You could serve this as a vegetarian main dish with bread to sop up the sauce, or you could serve it as a side. I almost think this dish could benefit with a tiny sprinkling of a tangy sharp cheese, such as Parmesan - just my opinion, of course!

Creamy Leek and Corn Orzo (Recipe Adapted from Claire Robinson)

2 cups orzo
1 cup finely sliced washed leek (white and light green parts only)
1 - 2 tbsp. extra virgin olive oil
1 - 2 tbsp. unsalted butter
8 large ears corn, kernels cut and cobs scraped for milk
4 tbsp. chopped fresh parsley
Kosher salt
Freshly ground black pepper

Cook the pasta according to the package directions in boiling, salted water. Drain and reserve the cooking water.

In another pot of boiling water, blanch the leeks for 1 - 2 minutes, then remove and shock in a bowl of ice water. Drain and set aside.

In a skillet over low heat, melt the butter and add the corn and scraped milk from all 8 cobs. Cook for 1 minute and add about 2 cups of the reserved pasta water. Bring to a simmer and cook until thick and reduced, between 10 and 20  minutes, stirring occasionally. Add more pasta water if it gets too dry. Add the blanched leeks and heat through, about 1 minute.

Add the orzo and toss to combine. Season with salt and pepper to taste. Transfer the corn and orzo to a serving bowl, garnish with parsley, and serve immediately.

Serves 6

Friday, July 20, 2012

Baked Pesto Chicken


I just LOVE four and five ingredient recipes. They normally involve ingredients I either have on hand in the pantry or can easily locate at my local grocery store. However, they're not always the cheapest, depending on what it is you need. Thankfully this easy recipe can be made using ingredients found at all grocery stores. It's Italian-themed, but is a good way to use up that pesto you've had sitting around. Plain chicken breasts are coated in pesto, then baked and topped with tomatoes and mozzarella to make a sumptuous, but still quite healthful, meal. Serve with garlic bread and a glass of good red wine for the complete dinner.

Baked Pesto Chicken

4 boneless skinless chicken breasts
½ cup refrigerated basil pesto
2 - 3 plum tomatoes, sliced (optional)
½ cup reduced fat mozzarella cheese, shredded

Preheat the oven to 400 degrees.

Line a baking sheet with heavy duty foil. Place the chicken and pesto in a medium bowl and toss to coat. Put the chicken on the prepped baking sheet.

Bake for 20 - 25 minutes or until the chicken is no longer pink in the center.

Remove from the oven and top with the tomatoes (if using) and the cheese. Return to the oven and bake an additional 3 - 5 minutes or until the cheese is melted.

Serve immediately from the oven with sides of your choice.

Serves 4

Tuna Tortellini


This is a rather strange sort of little recipe that falls in the realm of the 4 ingredients. Prepackaged tortellini is mixed with peas and canned tuna and lightly seasoned with basil to form a quick, but oddly satisfying supper. It's great for when you're in a hurry and you basically need food on the table like, yesterday. I prefer to drain off the oil from my canned tuna, since it sometimes has a weird taste to it, but if you don't have extra virgin olive oil on hand, just used the canned oil. For reference, the Buitoni brand of tortellini is particularly good - you can find it in the refrigerated section of your grocery store (probably near the dairy section).

Tuna Tortellini

1 lb. refrigerated or frozen cheese tortellini
2 cups frozen baby peas
1 (12 oz.) can tuna, packed in olive oil
½ tsp. dried basil leaves
Kosher salt
Freshly ground black pepper

Cook the tortellini in boiling salted water until tender, adding the peas for the last minute of cooking. Drain well.

Meanwhile, drain the tuna, reserving 3 tbsp. of the oil. If you don't want to use the oil in which the tuna is packed, you can drain the tuna, then use around 3 tbsp. fresh extra virgin olive oil. Return the tortellini and peas to the pot and add the tuna along with the reserved (or fresh) oil, basil, salt and pepper to taste. Heat through, stirring gently.

Serve immediately. If desired, sprinkle each serving with a little freshly grated Parmesan cheese.

Serves 4

Sunday, July 15, 2012

Fragrant Lemon Grass and Ginger Pork Patties


Again with Asian-themed food! This time, I've whipped up something different. It's a burger, but not your typical burger. For starters, it's made with ground pork instead of beef, chicken or turkey. Fresh flavors from ginger and lemongrass form the basis of this burger. Lemongrass is a new ingredient for me to use, but it's great. It lends a good citrus zing to whatever you're adding it. These burgers are naturally gluten-free, free from refined sugars, and are rather low in fat - remember, just because it's pork does not mean it's extremely high in fat as compared to beef. The burgers are lightly pan-fried in a little bit of canola oil, but if you don't want to add any additional fat, you can dry fry them or use a little nonstick cooking spray.

Fragrant Lemon Grass and Ginger Pork Patties

1 lb. ground pork
1 tbsp. grated fresh ginger
1 lemon grass stalk
2 tbsp. canola oil
Kosher salt
Freshly ground black pepper

Put the pork in a bowl and add the ginger. Season with salt and pepper. Remove the tough outer layers from the lemongrass stalk and discard. Chop the center part as finely as possible and mix into the pork. Use your hands to blend everything well. Shape into four patties and chill for about 20 minutes.

Heat the oil in a large, nonstick pan over medium heat. Add the patties and fry for 3 - 4 minutes on each side, or until cooked through. Remove from the pan and drain on paper towels.

Serve on burger buns with thick slices of tomato, lettuce and a splash of chili sauce (recommended:  Sriracha).

Serves 4