Saturday, January 29, 2011

Butternut Squash and Cider Soup


Butternut squash and autumn/winter go hand-in-hand.  This rich, creamy soup is seasoned with a somewhat unusual ingredient - apple cider.  Make sure to use a non-spiced cider, otherwise those spices will come through in your final product.  Serve with a loaf of crusty bread (or sandwiches, as shown here) and don't forget the apple!

Butternut Squash and Cider Soup

1 shallot, sliced
1 clove garlic, minced
1/4 cup water
3 cups peeled, seeded and cubed butternut squash (about 1 large squash)
1/2 cup reduced sodium chicken broth
3/4 cup plain apple cider
1/4 cup reduced fat or fat free sour cream
1/2 tsp. kosher salt or more to taste
1/2 a Honeycrisp or Granny Smith apple, unpeeled, cored and finely diced
Cracked black pepper

Heat a medium saucepan over low heat.  Add the shallot, garlic and water and cook until the shallot and garlic are softened, being careful not to let them burn, 3 - 5 minutes.  Add the squash and chicken broth and bring to a boil.  Reduce the heat, cover and simmer until the squash is soft, about 20 - 25 minutes.

Carefully pour into a blender; this should be done in batches.  Make sure the lid is cracked, otherwise you could end up with a very nasty steam explosion.  Cover the lid with a towel and puree until smooth.  Add the cider, sour cream and salt and blend until well-combined.  The soup can be made ahead up to this point.  Reheat over low heat.  Season with additional salt if needed.

Ladle the soup into four bowls.  Garnish with the diced apple and cracked black pepper.  Serve with a loaf of crusty bread.

NOTE:  3/4 tsp. kosher salt seemed like an appropriate amount to me.  However, you can always choose to use more.

For a variation, try toasting pecans.  Chop them reasonably fine and sprinkle on top of the soup.

If you are not a fan of sour cream, there are other ways to add silkiness to the soup.  You can use a higher fat content milk (like whole), half-and-half and for ultimate decadence, heavy cream.  Just be mindful that you should slowly add the liquid until the soup is of a consistency you desire.


Smoked Ham and Sharp Cheddar Cheese, on an Artisan Asiago Loaf

Wednesday, January 26, 2011

Breakfast Bulgur


Plain oatmeal can take a hike because the new whole grain in town is bulgur wheat!  This highly nutritious grain has been eaten for over 8000 years and is rich in fiber and protein.  Its nutty flavor combined with simple ingredients you probably have in your cabinets creates a filling, hearty breakfast.  Feel free to experiment with the seasonings and other additions!

Breakfast Bulgur

2/3 cup bulgur
1 1/3 cups cold water
Dried fruit of choice, chopped
Nuts
Cinnamon or nutmeg, to taste
Sunflower seeds, pumpkin seeds or other seeds, to taste
Brown rice syrup, pure maple syrup or honey

Add the bulgur to cold water.  Bring to a boil and then turn down to a simmer.  Simmer, covered, for 12 - 15 minutes.

After it is cooked thoroughly, add the dried fruit, seeds, nuts, spice(s) and syrup - as much as desired.

Serve hot!

Leftovers can be refrigerated, preferably without any syrup on top.  Eat the leftovers within a few days.

Serves 2 - 4

NOTE:  Since this is such a versatile recipe, you can tweak it any way you'd like.  My featured photo shows chopped fresh Fuji apple (I prefer fresh fruit over dried) and is seasoned with both cinnamon and nutmeg because I love both of those spices.  I didn't have any seeds or nuts on hand, so they were omitted.  I chose to use honey as my sweetener because it's what I had - I don't recommend using more than 1/2 - 1 tsp. of honey (or the other sweeteners) per bowl because it can turn into an overly sweet bowl of slop very quickly.

If you find that yours turns out a little bland, by all means, cook the bulgur with some added salt.  I don't miss the salt because I seasoned mine so heavily with the cinnamon and nutmeg!

**If you're having a hard time finding bulgur wheat, you can find it at Pick 'n Save stores and selected Sendik's locations (call to see if your particular store carries it) - the New Berlin location does NOT carry it, so don't even bother looking for it there.

Monday, January 24, 2011

Almond Jam Bars


This is another very old heirloom recipe from the late 1930s or early 1940s and it comes from the Wisconsin Electric Company Cookie Book.  These are soft, delicious bar cookies with preserves for the filling.  A slight clove flavor is detectable in the aftertaste.  Be patient while making these - the dough can be difficult to work with.

Almond Jam Bars

1/2 cup butter
1/2 cup sugar
1 egg
1/2 tsp. pure almond extract
3/4 cup black raspberry jam
1 1/2 cups flour
1/2 tsp. baking powder
1/2 tsp. cinnamon
1/4 tsp. cloves

Cream the butter and sugar together until well-blended.  Add the egg and beat until light and fluffy.  Add the almond extract.  Sift the dry ingredients together and combine with the creamed butter mixture using a pastry blender.

Spread half of the mixture into a 7" x 11" pan.  Be sure to grease the pan well - grease the sides, too.  Cover evenly with the jam and spread with the remaining mixture.  Bake at 400 degrees about 25 minutes.  Cool and cut into bars or small squares.

Makes about 28 bars

Sour Cream Cookies


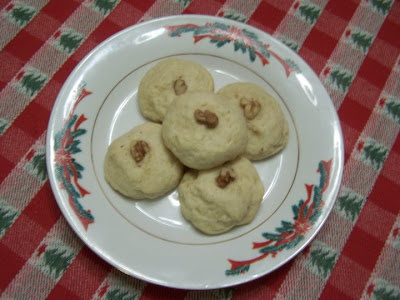
This is by far my most favorite Christmas cookie.  The origins of this cookie are unknown but I got this recipe from my grandma (it's also her favorite cookie, too).  These are a simple drop cookie and are moist and delicious with a pronounced nutmeg taste.  Serve with a cup of dark coffee.

Sour Cream Cookies

1 cup butter
1 1/2 cups sugar
2 eggs
4 cups flour
1/2 tsp. baking soda
1/2 tsp. kosher salt
1 tsp. nutmeg
1/2 cup fat free sour cream (feel free to use whatever kind of sour cream you'd like, however)
Raisins or walnut pieces

Cream the butter and sugar until light and fluffy.  Add the eggs, beating well after each addition.  Add the sifted dry ingredients and the sour cream.  Mix well.  At this point, you can either make the cookies right away or chill the dough.  I recommend chilling the dough for an hour or two.  Drop the dough by teaspoonfuls onto sheet pans covered with parchment paper.  Put a raisin or a walnut piece in the center of each cookie.  Bake at 350 degrees about 12 minutes, or until golden brown on the bottom.  

Makes about 7 dozen (Realistically, you might only get slightly more than 4 dozen if you make them bigger, like I do.)

NOTE:  Store these in a cookie tin or other large container with a piece of white sandwich bread to help keep the cookies soft and moist.

Pecan Fingers


Pecan fingers are a very old Christmas cookie.  The recipe I use is from the late 1930s or early 1940s and comes from the old Wisconsin Electric Company Cookie Book.  If you have a KitchenAid or other stand mixer, I highly suggest using it to make the dough versus making it by hand because the mixer will make the dough exceedingly tender, resulting in a very short, melt-in-your-mouth, end product.

Pecan Fingers

1 cup butter, softened
1/4 cup confectioner's sugar
1 tsp. vanilla
1 tbsp. water
2 cups flour
1/4 tsp. kosher salt
2 cups grated pecans

Cream the butter and then add the sugar, vanilla and water.  Add the flour, salt and grated nuts.  Chill the dough in the refrigerator for 1 hour, but overnight is better.  Form the dough into small rolls about the size of a pinkie finger.  Place on greased cookie sheets, or sheet pans covered with parchment paper.  Bake at 350 degrees for 18 - 20 minutes.  Roll the cookies in confectioner's sugar while still warm.

Makes about 5 dozen

NOTE:  The original recipe called for a baking temperature of 250 degrees and a time of 1 hour.  The changed temperature and time expedites the entire process greatly.  Also, the things you see in the store labeled as "pecan fingers" are nowhere near the real thing.  They're usually filled with preservatives and are not finger-shaped.  Sometimes you'll see them as crescents or other shapes.  This is an heirloom recipe using real ingredients; imitation is suicide.

Spritz Cookies


Traditionally reserved for the holidays, spritz cookies are an indulgent treat.  Butter-rich and not too sweet, these cookies take some practice to make correctly but once you get the hang of it, the whole process goes quickly.  Have someone help you sugar these so you can go a little faster.

Spritz Cookies

2 1/2 cups flour
1/2 cup + 1 tbsp. sugar
3/4 tsp. kosher salt
1 cup butter, softened
1 egg
1 tsp. vanilla extract
1/2 tsp. almond extract

In the bowl of a stand mixer fitted with the paddle attachment, cream the butter and sugar well.  Add the egg, dry ingredients and the flavorings.  Blend thoroughly.

Load up a cookie press and press using desired shapes onto ungreased cookie sheets; do NOT use parchment paper, as the cookies will not stick to the paper.  Make sure to make the cookies right away - do NOT chill the dough.  Chilled dough will not come off the press.  Bake at 400 degrees for 7 - 8 minutes, or until lightly browned.

Makes about 6 dozen, depending on the size of the shapes you use

Ultimate Ginger Cookies


If you love spice cookies, try this recipe.  It is studded with crystallized ginger and seasoned with lots of ground ginger.  They have a crusty exterior but a soft interior and are great to dunk in coffee.  These cookies do not have to be reserved for the holidays - consider them an "every day" cookie!

Ultimate Ginger Cookies (Adapted from Ina Garten)

2 1/4 cups all purpose flour
1 tsp. baking soda
2 tsp. cinnamon
1 tsp. ground ginger
1/2 tsp. ground nutmeg
1/2 tsp. ground cloves
1/4 tsp. kosher salt
1 cup dark brown sugar, lightly packed
1/4 cup vegetable oil (can also use canola or another neutrally flavored oil)
1/3 cup unsulfured molasses (recommendation:  Brer Rabbit brand)
1 extra large egg, at room temperature
1 1/4 cups chopped crystallized ginger (about 6 oz. or so)
Granulated sugar, for rolling the cookies

Preheat the oven to 350 degrees.  Line 2 sheet pans with parchment paper or lightly grease two sheet pans.  

In a large bowl, sift the flour, baking soda, cinnamon, cloves, ginger, nutmeg and salt.  You can use your hands to make sure there are no large lumps of flour (I use a whisk to do this and it comes out lump-free every time.).  In the bowl of an electric mixer fitted with the paddle attachment, beat the brown sugar, oil and molasses on medium speed for 5 minutes.  Turn the mixer to low speed, add the egg and beat for another minute.  Scrape down the sides and the bottom of the bowl and beat for 1 more minute.  With the mixer still on low, add the dry ingredients to the bowl and then beat on medium speed for 2 minutes.  Add the crystallized ginger and mix until combined.

When it comes to forming the cookies, you have a few different choices.  You can scoop the dough using two spoons, or you can use a small ice cream scoop.  If you're not concerned about uniformity in size, just use a regular kitchen teaspoon to scoop out some dough.  Roll the cookies into balls (about 1 inch or so), then place on the sheet pans.  Using a fork, press the tines into the dough to make a criss-cross pattern (like you're making peanut butter criss-cross cookies).

Bake for exactly 13 minutes - if using convection baking, you may want to shorten the baking time just a little.  The cookies will be crackled on the top and soft inside.  Let the cookies cool on the sheets for 1 - 2 minutes, then transfer to a wire rack to cool completely.

NOTE:  If you find that your cookies are a bit crisp, don't fret.  Put them into a cookie tin and add a piece of regular sandwich bread; the bread will help soften the cookies over the course of a day or two.  Enjoy!

Peanut Butter Blossoms


These cute little cookies are just too good to reserve for the holidays.  Make them whenever you're having a major craving for peanut butter.  I do not recommend using any type of commercial peanut butter for these aside from natural peanut butter, which has NO sugar or trans fats (all other peanut butters that aren't natural have added sugars and trans fats in them).  Smuckers Natural Creamy peanut butter is a wonderful brand to use here.

Peanut Butter Blossoms

48 Hershey’s Kisses chocolates
½ cup butter
¾ cup Smuckers Natural creamy peanut butter
1/3 cup granulated sugar
1/3 cup packed light brown sugar
1 egg
2 tbsp. milk
1 tsp. vanilla
1 ½ cups flour
1 tsp. baking soda
½ tsp. kosher salt
Granulated sugar

Preheat the oven to 375 degrees.  Remove the foil from the chocolates.

Beat the butter and peanut butter in a large bowl until well blended.  Add 1/3 cup sugar and the brown sugar; beat until fluffy.  Add the egg, milk and vanilla – beat well.  Stir together the flour, baking soda and salt; gradually beat into the peanut butter mixture.

Shape the dough into 1 inch balls.  Roll in granulated sugar and place on ungreased cookie sheets or on sheet pans lined with parchment paper.

Bake 8 – 10 minutes or until lightly browned.  Immediately press a chocolate into the center of each cookie; the cookie will crack around the edges.  Remove from the sheet to a wire rack and allow to cool completely.

Makes about 4 dozen

Chocolate Crinkles


A Christmas classic, chocolate crinkles are rich, soft cookies with a delectable flavor.  If you do not have baking chocolate on hand, you can make these using cocoa powder and a neutrally flavored oil (follow the directions on the cocoa container for making up the equivalent to baking chocolate).

Chocolate Crinkles

2 cups sugar
1/2 cup vegetable oil (or other neutrally flavored oil such as canola or safflower)
4 oz. unsweetened chocolate
2 tsp. vanilla
4 eggs
2 cups flour**
2 tsp. baking powder
1/2 tsp. kosher salt
1 cup confectioner's sugar

Melt the chocolate over low heat on the stove.  In a large mixing bowl, mix the sugar, oil and vanilla and then add the melted chocolate.  Mix the eggs in one at a time.  Stir in the dry ingredients.  Cover and refrigerate for at least 3 hours.  

Cover two sheet pans with parchment paper.  Drop the dough by teaspoonfuls (use a baking teaspoon, not a kitchen teaspoon; you run the risk of making your cookies too big by using the latter) into the confectioner's sugar; roll around to coat.  Shape into balls and place about 2 inches apart on the sheet pans.

Bake at 350 degrees for 10 - 12 minutes.  If you're using convection baking methods, do not bake for the full 12 minutes - anywhere between 10:30 and 11 minutes will give you the consistency you're looking for.

Yield:  5 dozen

 **The dough seems to be rather soft using only 2 cups of flour and they have a tendency to flatten and spread.  You may certainly adjust the amount of flour.  A good starting point would be to add 2 1/2 cups flour and see what the consistency is like.  I don't recommend adding any more than 3 cups of flour, maximum.

Roasted Salmon with Green Herbs and Chive Biscuits


Salmon can function as a fancy dinner or a casual one but this herbal salmon makes for a great meal.  The chive biscuits don't have to function as a side - I made these as a substitute for a potato dish.  I do recommend a potato-based side dish but of course, any other kind of vegetable dish you want can work here.  Alter the recipe just a little and this makes a wonderful fancy dinner for two.

Roasted Salmon with Green Herbs

2 – 2 ½ lb. skinless salmon fillet(s)
Kosher salt & freshly ground black pepper
¼ cup olive oil
2 tbsp. freshly squeezed lemon juice
½ cup minced scallions (4 scallions)
½ cup minced fresh dill
½ cup minced fresh Italian flat leaf parsley
¼ cup dry white wine
Lemon wedges, for serving

Preheat the oven to 425 degrees.

Place the salmon fillet(s) in a glass, ceramic or stainless steel roasting dish and season generously with salt and pepper.  Whisk together the olive oil and lemon juice and drizzle the mixture evenly over the salmon.  Let stand at room temperature for 15 minutes.

Stir together the scallions, dill and parsley.  Scatter the herb mixture over the salmon fillet(s), turning so that both sides are generously coated with the green herbs.  Pour the wine around the fish fillet(s).

Roast the salmon for 10 – 12 minutes, until almost cooked in the center at the thickest part.  The center will be firm with just a line of uncooked salmon in the very center.  Cover the dish tightly with aluminum foil and allow to rest for 10 minutes.  Cut the salmon crosswise into serving pieces and serve hot with lemon wedges.

Serves 6 if using one large fillet, or serves 2 if using two individual fillets

NOTE:  This can be made using fillets with the skin on.  For easier service, use individual fillets instead of one large fillet.  Prepare using the instructions, but pack the herbs on top of the skin-on fillets instead of coating them on both sides.  This is an absolutely delicious and fancy meal; buy two large fillets for a dinner for two – the amount of herbs will more than cover two big fillets completely.

Do NOT let the fish roast more than 12 minutes; it might look a little raw in the center but after letting it rest, it’s more than ready to eat.

Chive Biscuits

½ cup butter, cold and diced
¾ cup half and half
1 tsp. sugar
1 tsp. kosher salt
1 tbsp. baking powder
2 cups flour
½ cup chopped fresh chives or parsley
1 egg with 1 tbsp. water for egg wash

Preheat the oven to 400 degrees.

Combine the sugar, salt, flour and baking powder in a large bowl; use a whisk to blend the ingredients and break up any lumps in the flour.  Cut in the butter using a pastry blender and combine until the butter is about the size of peas.  Do not let the butter soften or form into a paste.  Add the half and half and the chives and mix until just combined.  Gather the dough into a ball and try to pick up the loose bits off the bottom of the bowl as best you can.

Turn out the dough onto a well-floured board or pastry cloth and knead lightly into a rectangle about ¾” thick.  You can also knead the dough into a round shape about 8 inches across or so, keeping with the same thickness.  Cut out rounds using a 2 ½” round cutter (if in the rectangle) or into 8 wedges (if in the circle).  Place on a lightly greased sheet pan and brush the tops with the egg wash.

Bake for 20 – 22 minutes, or until the tops are browned and the insides are firm.  Serve warm.

Makes 8 biscuits

NOTE:  ½ cup chives did not create much of a chive flavor; either add far more chives to the mix or use a combination of other flavorful fresh herbs.  These are delicious regardless, and can be made without using the herbs.

Sesame Noodles with Thai Peanut Sauce


Here's something a little different.  Forget paying for greasy, heavy takeout Thai food.  Make your own version of spicy sesame noodles!  This recipe features a rich, creamy and spicy sauce that pairs perfectly with the citrus-y bite of fresh cilantro leaves and the zing of chopped scallions.  Toasted sesame seeds add a nutty, delicious flavor.  Serve as the main course or as an accompaniment to Asian-themed grilled foods.

Sesame Noodles with Thai Peanut Sauce

Kosher salt
1 lb. Chinese egg noodles or spaghetti
1 one inch piece ginger, peeled and chopped
3 cloves garlic, smashed
2 tbsp. light brown sugar
1 cup Smuckers Natural creamy peanut butter
3 tbsp. rice wine vinegar
3 tbsp. low sodium soy sauce
1 tsp. Sriracha (Thai spicy chili sauce)
1 tbsp. toasted sesame oil
6 tbsp. water
2 scallions, sliced thin
1 tbsp. toasted sesame seeds (for garnish)
Fresh cilantro leaves (for garnish)

Cook the noodles in a large pot of salted, boiling water over medium heat until barely tender and still firm.

Drain immediately and rinse with cold water until cool.  Drain the noodles well and transfer to a wide bowl.

In a blender or food processor, add the ginger, garlic, brown sugar, peanut butter, vinegar, soy and chili sauces, sesame oil and water and process until smooth.

Put the blender jar into the refrigerator and let it chill for about half an hour.  Pour the peanut sauce over the noodles and toss until well-coated.

Serve garnished with the scallions, sesame seeds and cilantro.

Black Beans and Rice (Moros y Cristianos)


This dish is a classic Caribbean staple.  Seasoned with onions, garlic, chile pepper, this is a filling meal.  I do highly suggest adding the tomatoes; it really accents the dish.  Serve with crusty bread and a cold beer, as this can be a very spicy meal if desired.  

The Spanish name for this dish, 'Moros y Cristianos,' literally translates to 'Moors and Christians.' The black skins of the beans were meant to represent the dark skins of the Moors, who ruled Spain for hundreds of years.

Black Beans and Rice (Moros y Cristianos)

2 tbsp. olive oil
1 cup chopped onions
2 cloves garlic, finely chopped
1 habañero or other chili pepper, seeded & chopped or 1/4 tsp. red pepper flakes, or more to taste
1 cup diced tomatoes (optional)
2 1/2 cups cold water
1 cup long grain rice
1 tsp. salt
2 cups cooked black beans (2/3 cup if dried), rinsed and drained, if canned

Heat the oil in a large saucepan over medium heat.  Add the onions, garlic and pepper (or pepper flakes).  Cook, stirring, until tender, 5 to 8 minutes.  Stir in the tomatoes (if using), water, rice and salt.  Bring to a boil.  Stir in the beans.

Cover and cook over medium low heat until the water is absorbed and the rice is tender, about 20 minutes.  Remove from the heat and let stand, covered, for 10 minutes before serving.

NOTE:  Depending on what type of rice you use, it might take longer than 20 minutes for the rice to become tender.  If it looks like there's not enough of liquid and your rice isn't tender, add anywhere between 1/2 to 1 full cup of additional water.  Add another 10 minutes of cooking time and taste test for doneness.  Brown rice may take up to 40 minutes to cook fully.

Sausage and Pepper Subs


What could be more casual than bratwurst?  This is another quick, easy and most importantly, tasty meal.  Serve with sides of your choice.  Yes, the lemonade is actually a very nice beverage to serve with these.

Sausage and Pepper Subs

12 oz. turkey sausages
1/3 cup reduced sodium, fat free chicken stock
2 tbsp. olive oil
1 large onion, thinly sliced
3 cloves garlic, minced
1 large red bell pepper, thinly sliced
1 large green bell pepper, thinly sliced
1 1/2 tsp. minced fresh oregano (optional)
1 tbsp. balsamic vinegar (optional)
Salt and pepper to taste
4 sub rolls, split lengthwise and warmed

Brown the sausages in a large skillet over medium heat.  Add the chicken stock and cook, covered, for 10 minutes.

Remove the sausages to a plate.  Pour off all but 1 - 2 tbsp. of the liquid in the pan.  Add the olive oil, onion and garlic.  Cook, stirring, until softened, about 6 - 7 minutes.  Add the sliced bell peppers, oregano (if using), salt and pepper.

Cook until the peppers are softened, about 5 minutes.  Return the sausages to the pan and cook for 3 minutes.  Stir in the balsamic vinegar (if using).

Adjust the seasonings and spoon the mixture into the warmed sub rolls.  Gently press the sandwiches together and serve warm.

Chinese Spiced Pork Chops


If you're looking for something a little different to add to your repertoire, look no further.  These pork chops are marinated in a Chinese 5 spice mix blend, making them warm with the flavor of star anise, cinnamon and other seasonings.  The chops shown here are boneless, but you could use bone-in chops if need be - however, you may have to adjust cooking times accordingly. This recipe assumes you are using boneless pork chops.  Serve with rice or sautéed vegetables (or with a green salad, as featured in the photo).

Chinese Spiced Pork Chops

4 large pork chops, about 7 oz. each
1 tbsp. Chinese 5 spice powder
2 tbsp. reduced sodium soy sauce
2 tbsp. garlic infused olive oil

Arrange the pork chops on a non-metallic roasting pan or baking dish.

Sprinkle the 5 spice powder over the chops, then drizzle over the soy sauce and garlic infused oil.  Alternatively, mix together the oil, soy sauce and 5 spice powder, and pour over the chops.

Using your hands, rub the mixture into the meat.  Cover with plastic wrap & chill for 2 hours.

Preheat the oven to 325 degrees.  Uncover the dish and bake for 30 - 40 minutes, or until the pork is cooked through and tender.  Serve immediately with the aforementioned sides.

Honey Mustard Chicken & Olive Oil Mashed Potatoes


Simple, delicious and it can be on the table in half an hour!  Use a good quality whole grain mustard (I recommend Grey Poupon) for this - it'll make a difference.  The scallion-studded, garlicky potatoes make an excellent accompaniment.  You can also make this dish using chicken thighs instead of boneless, skinless chicken breasts.

Honey Mustard Chicken & Olive Oil Mashed Potatoes

4 boneless, skinless chicken breasts (or 8 chicken thighs, with skin and bone)
4 tbsp. whole grain mustard
4 tbsp. honey
Salt and pepper, to taste

Mix the mustard and honey - season with salt and pepper to taste.  Brush the mixture all over the chicken breasts (or thighs).

Cook for 25 - 30 minutes, or until cooked through.

Serve with a chunky tomato and red onion salad or with vegetables of your choice.  Mashed potatoes make an excellent accompaniment.

Serves 4

Olive Oil Mashed Potatoes

1 1/2 lb. Yukon Gold potatoes, halved or cut into 2" chunks
6 cloves garlic
1/2 tsp. kosher salt
1/2 tsp. ground black pepper
1 cup chopped scallions
3 tbsp. extra virgin olive oil

Place the potatoes, garlic and salt into a large saucepan and add enough water to cover the potatoes.

Place over high heat and boil the potatoes until fork tender, about 15 - 20 minutes.

Remove the potatoes and garlic from the heat, drain them and return them to the pan.  Mash the potatoes and garlic with the tines of a fork (or a potato masher), making sure to mash each piece of potato and garlic.

Add the pepper, scallions and oil.  Mix well.

These can be made ahead of time and reheated in the microwave on high for 1 - 2 minutes.

**If you notice that the texture of your potatoes seems a bit dry, you may certainly add a splash or two of hot chicken stock, or some of the potato cooking water (if you chose to save some).  A splash or two of milk will also work.

Serves 8 (1/2 cup servings)